

Frequently Asked Questions
How to: The Curling Barrels
How to: The Curling Barrels
There are two curling barrels (left/right)
- Left-Rotating Attachment: For curls counter-clockwise, recommended for the left side of the head.
- Right-Rotating Attachment: For curls clockwise, recommended for the right side of the head.
Instructions:
- Start with hair that is 80-90% dry. Choose the direction of the curl, then attach the corresponding barrel.
- Section 2-3 strands of hair from each other. Expert tip: Apply styling products if desired.
- Take a strand of hair approximately 1-2.5 cm wide and hold it 10 cm from the ends, ensuring the ends are free.
- Turn on the styler. Move the styler behind the hair ends and let the ends automatically wrap around the middle of the attachment.
- Once the ends are gripped, let the styler work for 5 seconds, then gently pull it away to release the curl, ensuring the styler is not turned during this process.
- To achieve perfect curls and prevent heat damage, keep the hair tensed around the attachment for 5 seconds in the same position and let it cool down. For optimal results, repeat until the hair is dry.
Additional Styling Tips:
- Use narrower strands for more defined curls.
- Use hair clips to prevent unwanted hair from being wrapped in the curler.
- Prepare more voluminous or curly hair for curling by straightening it with the paddle brush beforehand.
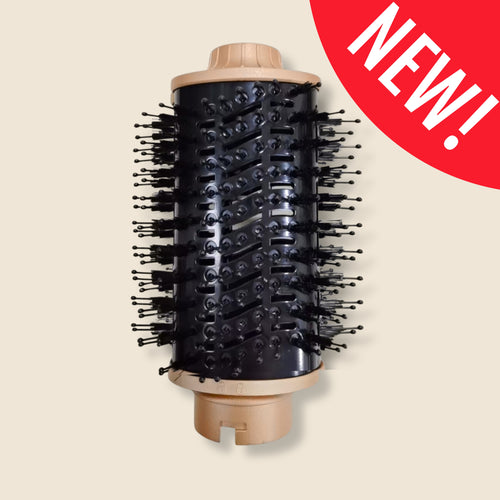
How to: The Volumizing Brush
How to: The Volumizing Brush
Achieve More Volume for Your Hair
Volumizing Brush Attachment
Step-by-Step Guide:
- Start with Damp Hair: Begin with hair that's about 60% dry or towel-dried. For added effect, apply your favorite hair products or styling agents.
- Section Your Hair: Divide your hair into sections according to your preference. For voluminous blowouts, start by placing the round brush close to the roots underneath the hair.
- Roll Outward: Place the brush at the roots and roll it outwards to the tips, letting the bristles gently grasp your hair.
- Repeat: Continue the rolling action with the remaining sections until your hair is styled into a light, voluminous look.
Additional Styling Tips:
- For fine hair, try reducing the airflow to minimize frizz.
- For thicker hair, consider increasing the heat to achieve results faster.
- If you have curly or wavy hair, increase the heat to achieve a smooth style.
Remember to always use the brush in the direction of the roots for the best volumizing effects, and adjust the temperature according to your hair type to prevent heat damage.
How to: The Glide Brush
How to: The Glide Brush
Achieve Sleek and Smooth Hair
Smooth Glide Brush Attachment
Step-by-Step Guide:
- Start with Partially Dry Hair: Begin your styling routine with hair that's about 50% dry to maximize volume building.
- Root Placement: Position the brush at your roots to allow the detangling bristles to grab and smoothly style your hair.
- Smooth Downward: Brush from the roots to ends in a curved motion to harness the brush’s smoothing bristles for a sleek finish.
- Repeat for All Strands: Continue with the rest of your strands until you achieve a polished, voluminous style.
Additional Styling Tips:
- For fine hair, minimize air flow to reduce frizz.
- For thick hair, try smaller sections for smoother results.
- For wavy or curly hair, use smaller sections and repeat the brushing to refine your smooth style.